Tuesday, February 1, 2011

Paneling

Every time I've tried to finish the prep-work on the deck, it's been raining or simply too late in the evening to start.  Sunday would have been perfect, but all that snow the folks up north are now getting, started out as steady showers for us down here.....and its still raining.  Yay.

I elected to take on a task inspired by other more eager rebuilders, that being to place paneling inside for improve the aesthetics.  Given that I'm not skilled at fitting wood to contour to all the curves of the hull, I had to choose the areas I would improve carefully.
First off, I obtained a 1/4" sheet of 4x8 hardwood plywood.  After staining it with two coats and a follow-on coat of varnish, I had the base material I would cut from.


My first area of choice is the port area under the window.  For anyone considering this change, it really is quite easy once you look it over.  The CM has a recess along the under-sided of the hull where you can brace the top edge of a panel, eliminating some of the responsibility to secure the piece.   The panel I replaced it with simply had to increase in size from 5 1/2" to 7 1/2" to match the shape of the area.  I then put some glue along the bottom edge, and braced it to ensure a solid bond.

Note: the front 15" is a separate piece from the rest of it in case I needed to get to those side-stay bolts.

Also, I primarily used glue and strategically placed 1/4 round to hold it in place.   Drilling into the hull did not seem like a good idea.

Throwable life preservers and expandable poles were used to hold the paneling flat against the hull while the glue set.
The forward berth entrance way needed a little something.  Granted, its not important, but every little bit helps. 
 
Since this boat always gets wet, I did not extend the wood all the way to the floor.  Its paneling and will get ruined with consistent exposure to water.
The SB quarterbert.  You really have to stick your head in there to see that I did not extend the paneling all the way to the rear.  Who's going to see that anyway?  

This picture has something to be desired.  Though I would have liked to include the entire inside in this project, I can't figure out how to do outside curves with any finesse. It will just have to remain white for now.


This is a tip to cut down on wear to the stern gelcoat.  Though I tried a few other ways to do this, I've settled on permanently attaching this piece of furniture slider padding.  Its made of that incredibly slippery plastic....called ????  I forget, but you can buy it in all kinds of shapes at Home Depot.   My tiller was eating into my boat and I had to stop it some way.

Monday, January 24, 2011

A sanding we shall go....

That's all I'm doing is sanding, sanding and more sanding.  No pics today since a sanded surface looks only marginally different from the oxidized version.    What I am finding is that much of the brightwork is not coming off.  Years exposure to the elements have resulted in way too many frozen nuts.  After stripping the heads of four screws, I've given up on the majority of removable cam cleats, rope cleat and railings.  I guess that is what they made 3m tape for.   May the next owner enjoy cussing me for my transgressions just as I'm ticked about some PO that painted the rub rail.

I'm about 3 hours away from the final scrubs and the initial coat of primer.

Sunday, January 16, 2011

Forward berth and Exterior Prep work


Though I had intended on following a specific set to goals this weekend, as usual the priorities of effort meandered from the path like an Ohio riverbed during a flood.


By the end of the weekend, I accomplished several tasks. The first was the near-completion of the forward berth. The lack of finish work there has been an annoyance to me. It matters little that its unfinished, but every time I look in there, I have felt the pull to put some of the problems to rest.  I also corrected a problem with the cabin and started sanding down the entire topside in preparation for painting.

Cockpit Mystery Indentation

Anyone who owns a Clipper Marine 26 is annoyed to deal with a squarish indentation to the port of the entryway.  It had a purpose of some sort, but no one can figure out what they were thinking when they added it to the design.  It does not hold a beer well, it does hold water so personal items should not be stored here, and its a hassle to clean.   The time has come for it to go.

Using some resin and fiberglass, I fabricate a plate of fiberglass to be used to cover over the hole. First off, I matched the hole to the panel and marked where I would cut. 
The first initial cut was followed by a more precise fitting.  The goal was to get the panel to sit just inside the lip and allow me to pour a layer of strengthening resin over the top.  The end result being a simple flat surface to step on.


I also decided to leave the original bottom in place.  The resulting self will become yet another place to store emergency gear.

As I write this, the resin is still drying.  I must have not put enough hardener in it.

The blue tape was there to keep the resin from running around the panel edges. The tape did not hold in a couple spots to my great aggravation, so now I have puddles of resin pooling inside my self.   If I had gotten the right amount of hardener in, that would not have been a problem.

Next came the cruelest to tasks.  Prepping the exterior for painting.  With the hundreds of times that I crawled in and out of the cabin, I inevitably tracked gobs of resin all over the cockpit.  All these spots now had to be carefully scraped and sanded out.  Not a lot of fun.


Also, no one warned me about the hassles involved in pulling hardware.  It's a two man job, and I've got boys who are more interested in Xbox than helping me for several hours as I break down the myriad of locking bolts. There are several things I'm simply going to tape off since they are bolted down so tight that a blowtorch it required to get them free.

On the positive side, I did manage to sand down 90% of the top-side thanks to a nice orbital sander and $10 in pads.   ...and one other thing.   I think this boat used to be bright blue.  It's been painted at least once, if not twice.  I figured this out when my sander bit a little deep when fixing scratches.

Forward Berth: 

 This is a shot of the forward wall (bulkhead).  The bottom-most edge was rotted to paste.  Someone had started the the restoration work and gave up leaving the hole.

One of the unexpected challenges here was the shelves.   Since they butted up against the wall and the wall was toast, I had to figure a way to cut the wall away but save the shelves.  My solution was to chisel everything out and worry about the reconstruction process later....which, oddly enough, worked fairly well.  Besides the shelves, the only thing I saved from the forward berth was that little door.

 Problem One in replacing the forward berth was getting the v-shaped wood into place.  I had to cut angle chunks from the shelves to allow me to slide this piece into place.   This ruined the structural integrity of the shelves, which I resolved with small triangular braces epoxies under each shelf.

Fast forward to this weekend.  Except for painting the ceiling, we are pretty much done with this area.  I'm considering putting some carpet on the walls, which is popular right now.  It will quiet the place down while trying to sleep, but offers mildew a place to start.  I'm torn.

Note that I chopped and reshaped the original teak shelf railing to match the new angles.  That was a pain, just as was getting the 1/4 round to contour to the curve of the hull.

Next up, more sanding down the rest of the topside and priming it for the final coat.

Sunday, January 9, 2011

Table Work

The stock table is not only fairly ugly, mine was also falling apart.  The years of moisture and being ignored took its toll on that particular piece of the boat.  De-lamination was setting it so badly, there was no saving it.  On the advice of another boat restorer, I began to casually look around for a wrecked hardwood table I could salvage and replace my table with.   Its been a year without luck so I gave up and decided to fabricate something from scratch.

The old table was 27"x 46".  When I rebuilt the seats, I somehow managed to forget to ensure the replacements were square with each other.  As such, the replacement table had to be 46" long, but tappered slightly to allow the table to fold into a sleeping surface.  The edge over the swing keep was 27 1/2" wide, but at the hull, it was 26 1/4 wide....oops!   Time for more cowboy engineering.

I first grabbed some fairly strait pine that I recovered from another project.  The wood was painted black for that other use which helped identify where I needed to sand. 

I cheated and made two 12" x 2' boards and screwed them onto the back for structural integrity.

The top end you can see I also ran a thin strip of wood to enforce a perfect plain in preparation for the finished surface.

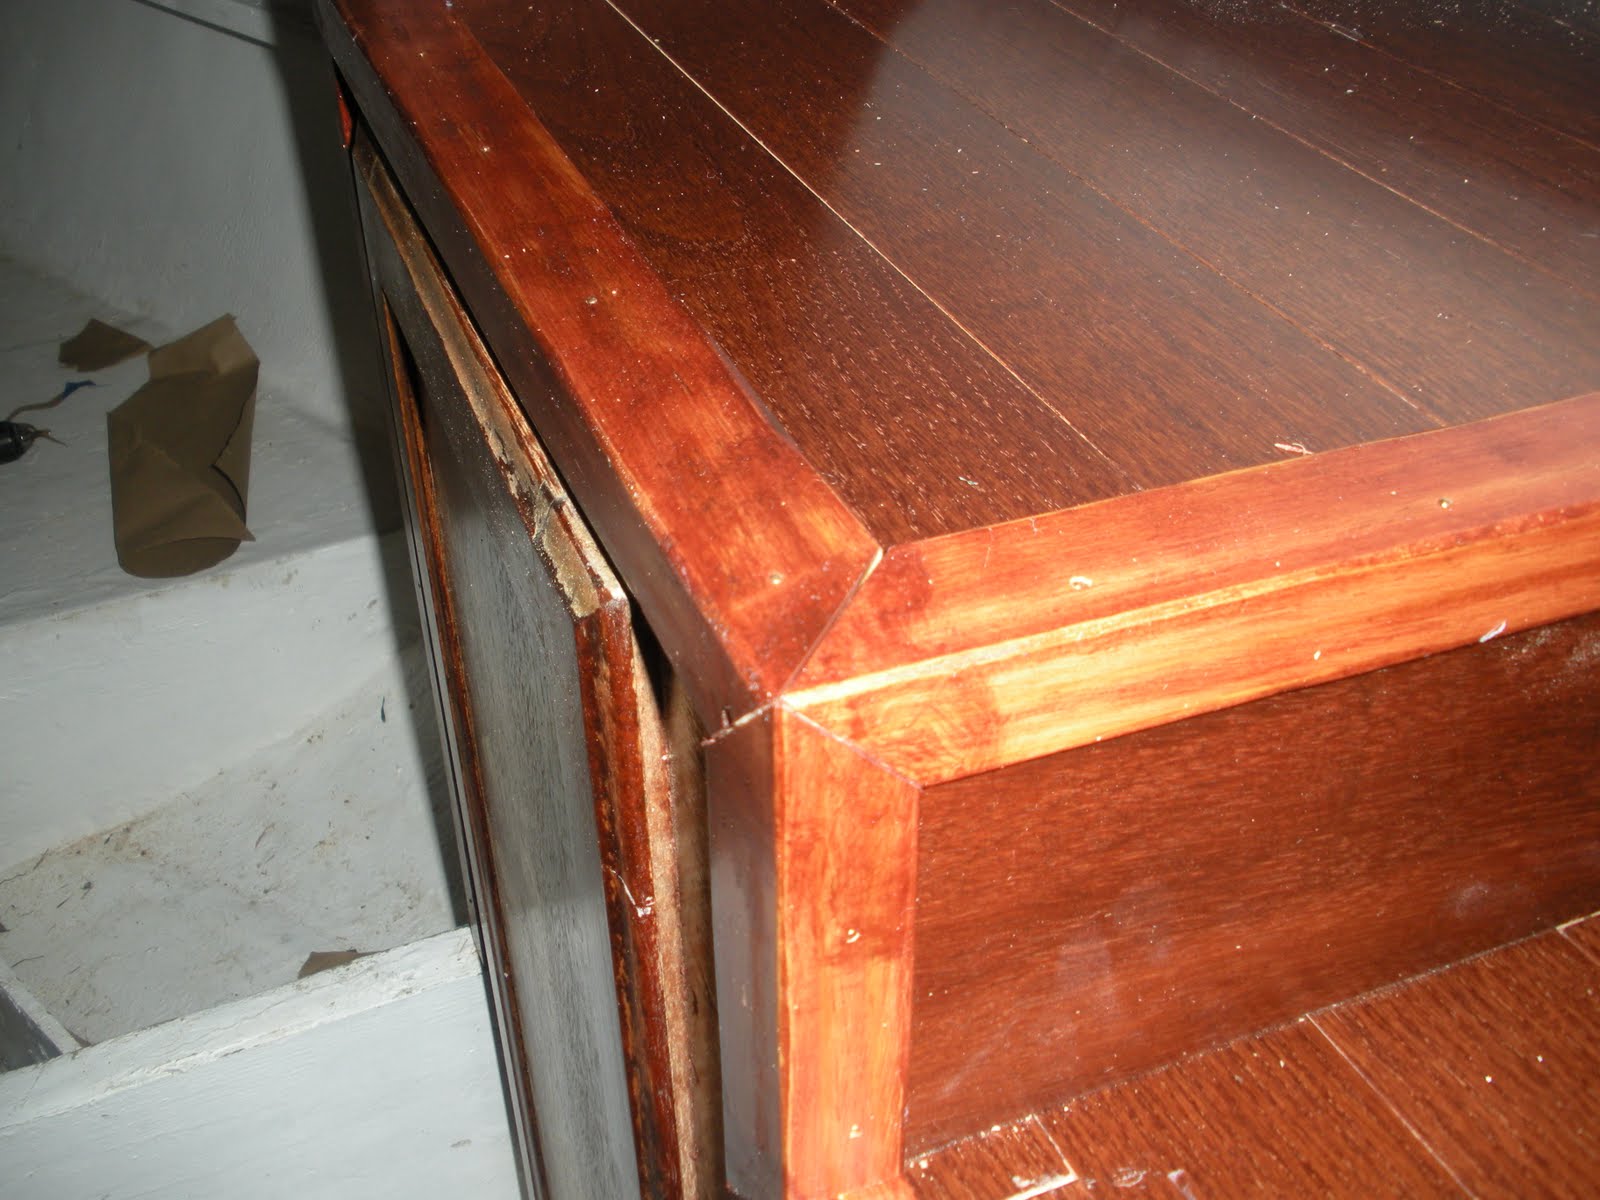
I totally cheated and used the tongue and groove flooring for the surface.  ($26 for a pack of 'hardwood' red oak at Home Depot)  After cutting the strips of flooring to match the area, I used Liquid Nails to bond the flooring to the pine.  Though I thought it would be faster, I figured out that Liquid Nail does not dry all that fast.  Also, the flooring had a tendency to want to lift.   Four clamps and a couple a pieces of scrap wood helped to force a good bond.   The next day, I would have needed a crow bar to bust them apart, just as I wanted it.

The Glueing process.

I took the remaining L-shaped corner moldings I had left over from the cabinet to create a nice edge finish.  The intent was to create a lip to go around the table which will help keep things from sliding around while at sea.  It won't keep a tackle box from rolling off, but it will slow down a bag of charts.

Getting the moldings on here proved to be one of the bigger hassles.  I know this is one detail that is going to be carefully evaluated for years to come each time someone sits down at this table.  It had to be as close to perfect as possible.  47 miter-saw cuts later, and I'm done.
Comparison of old vs. new. 

 After reattaching all the hardware, I manhandled it back into place.   There were a number of adjustments I had to make that I did not expect.  With my rhomboid design, the brackets that lock to the hull (under the shelf which you can't see) had to be repositioned off-center and and different depths.  The folding leg was the easiest.   I just eyed it.
Of course you have to have a down position so you can have another place to sleep.  I replaced the two runner boards (which you also can't see) that hold the table in place  while down.  To place them it was just a matter of figuring out the depth of the table and screwing in slats of wood the appropriate depth below the edge of the seats  My new table is 1 1/4" deep.  

If you want to pick at my workmanship, I know it is a tad longer than it needs to be, but I'm not willing to mess with it any further.  It will just stick out over the edge a bit.

I'm thinking that carpet may be an option.  I just did not get the surface appearance I wanted on these seats. I'm also considering adding some panneling to the walls.  Others have done this.  I just have to figure out how it is done so it looks professional.

Thursday, January 6, 2011

Keel cable and more finish work

As I get further into the detail work, I find I have less and less things to show that demonstrate dramatic improvements in the project. Still, for the sake of completeness and to show I’m not slacking off entirely, I’ll include this minutia work that I’m engaged in.


In the forward birth, I have several things that need attention. The first in the port-a-pottie platform. When I completed the glass-in work, I did not carefully inspect the area for neatness. In this pic I’ve gone back over the entire area to smooth out the largest bumps and grooves. You can’t really see a significant differences from this pic, but if you run your hand over the various edges you will no longer come away missing skin.


Of course, I need to repaint ....again.  yay.


I also attacked the backside of the SB wall tht sits just under the mast.  You can see where I did not clean-up the epoxy work.  Getting at these inside joints is a pain.   Anyone doing this work should think ahead and try to sand just after the epoxy hardens to knock down the high points easier.  Since no one except the sleeper will ever take time to carefully look at this particular seam, my shoddy work will likely go unnoticed for the most part.


 Just below this wall is some storage.   As with any fabrication work, and lacking something to go by, I had to figure out what Clipper was trying to do with this area. I had to build it so that there was enough room to step over the threshold, but maximize storage capacity.  This space has a removable lid which a realized needed some suppports to hold it firm should anyone put weight on the 1/2" thick cover.  Here I've installed two boards to give the lid support on all four edges.  The underside of the lid also has a lip to ensure it can't slide from it resting place.  I could have installed hinges, but decided not to.
Here you can see the lid in place.  The holes are there to help you pick up the lid.  I'm in denial that I really should sand this whole area down again and repaint.   I despise fiberglass dust.  Not matter if I wear an environment suite, it still finds a way to keep me itching for hours.
The next area of concern is the swing keel.  I know that my old cable as reliable as a dog watching a hamburger.   It was just a matter of time before it let me down in a big way, so it had to go.  After pulling the crank from underside of the aft seat, I unstrung it from the spool. As you can see here, it was a collection of kinks and frays waiting to check out while on the water.


This is the orginal crank.  It looks like crap, but it still works fine.  I did not see the need to spend another $50 getting a new one.

While I was cleaning this whole arrangement, I decided to clean up the aluminum support plate the crank hung from. I started to grind off the oxidation before I realized a before pic would be nice.


I took the liberty of grinding down the edges to make it a little more friendly and put a fresh coat of paint to pretty it up a bit further.


It will never look good, but at least I can make it look less ugly.


After a trip to the hardware store to get a matching length of stainless steel I rewound it back on the spool, bolted the clean-up plate and crank back into it’s factory-placed location, snaked the dirty end of the cable through the cable hole and replaced the eyebolt.   In this instance I am fortunate that my Clipper rides much higher on the trailer than it really needs to.  It’s a pain to launch, but it made things very easy when swapping out the keel cable.  I only had to jack the boat up a foot to get at the connection point.  From there, I mashed on an eye hole (or whatever this connector thing is called), and reassembled everything.   The entire job took about 90 minutes, with painting and all.

Next I'm thinking about taking on the final finish work in the forward berth.  That out of the way, I can refocus my effort on the exterior.....maybe I'll do some carpet on the walls, too.  Who knows.

Thursday, August 19, 2010

Back on it

It's been a while since I posted because all my time has been taken up with other projects.  Specifically, my Hobie and sailfish both needed the attention more.  At the end of the season, I managed to break both of them (Hobie and Sailfish) so badly that I had to cut the season to an end early. 

One of my friends forced the issue by crashing the port pontoon into the rocks, punching a hole in the bow.  This was actually a good thing.  The last few times I sailed it, I noticed that the same pontoon was taking on water faster than usual.  I figured a bolt or seam was breached, or I was just spending too much time with the pontoon burried in the water when I was flying the hull......WRONG.   That pontoon had a latteral crack along three feet of the hull's bottom edge.   Water was flowing in just about as fast as if I had left the drain plug open.  It was the internal flotation that was keeping me from sinking, not any boyancy.   It took my friend's mishap to force me to fully inspect the hull for damage.  The reapir work was extensive such that I could not do it and salvage the paint job.  I ended up sanding off the flames, patching all the dings and cracks I found and painting the whole thing over again.  Since you can't do just one, I had to redo both.  I'm back to a plain-jane White Hobie cat.   I'll put some cool flames back on it in the spring.

My 2nd pressing task was the 45 year old Sailfish I got for free when I bought the Hobie from my wife's cousin.  Apparently, this sailfish had been in the family since the 1960's.  Six years ago I decided to fix all the holes and repaint it.  Since then, I made every attempt to put it to good use.  After this last summer and multiple repairs since that initial rebuild, I've given up on it as a usable boat.  The Fiberglass is just too brittle for it to be sailed in anything but calm weather....and just what fun is that?

I had to corect several hair-line cracks, fill in many gouges and take the last paint job back down to the old gellcoat.  I also had to replace one of the handrails that did not survive the removal process.

This pic is a view of its new permanent home.  It is now an expensive ornament on the carport wall.  The hardest thing about this rebuild was designing a system of brackets and the means to get the boat in place without tearing the brackets off the wall.    After failing twice to place it, once with four teanage boys, and the 2nd time with the help of some adults, I resorted to picking the whole thing up with a block and tackle and swinging it into place. 
The little fish-thing in the middle is a piece of wood I cut and stained that has two bolts going into the wall.  It's not going anywhere.

...so that was the last three months.   I've no explanation as to why its taken me this long to get back on the job other than I did not want to work on a sailboat I did not have a clean title on, which I now do.  It has officially been registered in Louisiana for the past couple months.  Thanks goes out to the Lee in OK who went the extra mile to help straighten the legal mess out.   BTW, if you buy a boat in Louisiana, a signed title is not enough to get it registered.  Also, if you don't have a registration for the trailer, you are screwed.  The way Louisiana DMV laws are written, there is no way to legally register an old trailer when it comes in from out of state.  My only option is to write a district representative, I think.

back to the Clipper:


The task at hand that I've tackled is painting the interior.  Here is a quick pic I took of the underside of the pop-top.  The fiberglass was a speckled and mildewed brown.  You can see my progress as I cover it all with a high-gloss enamel.

Yes, I did all by hand with a brush.  I tried to roll it, but it did not get in the dimples very well.  You can't tell, but once I brushed it one direction, I had to go back over the surface with perpendicular strokes to get it all.
Something that has been bugging me was the windows.  They look aweful.  The frames aluminum is oxyidizing, and the plexiglass is spiderwebbed.
 

The light, that's got to go.  I just need to pick up some nice LEDs to go in its place.
 The problem was this stuff.  When they installed the windows, they used some sort of uber-adhesive glue that would have forced me to break something in my quest to get the frames out of the holes.  That being said, I decided to cut my losses and just paint what I could.  Later on, when I have better tools, or know-how, I will go back and try this again.


I did manage to get the inside braceing parts of the frames off and repaint them.  Here is the before and after pics of my painting efforts.


The after picture shows the improvement to the windows frame
I ended up taping the windows and painting the inside edge of the frames as well.  I does look 100% better than before.   Walls painted and the frames cleaned up, these sort of details are starting to prove their worth.

Monday, June 7, 2010

Cabinet Finished!

Looking back the the cabinet, I have to remember just how bad it appeared when I first started to rough it in.  I had my doubts about inverting the cooler.  It was rusty and I had no plan to get water out of it once ice melted.  Now it all covered up, has additional insulation/flotation surrounding it and I even rigged a spout to drain water.


Except for getting the wring strung out of the way, this area is pretty much complete.  I may add some shelves at some point.  TBD

Though I worried over this, I eventually decided to not put the sink back in.  I could not find a place to buy a decent pump and the old sink was not likely to serve a purpose on a consistent basis.  If I need to put it in, it is only a matter of sawing a hole and putting it back.


The top of the cabinet is covered in $35 worth of flooring material.  I figure its tough, it can stand a little water and it was easy to fit.  I opted for this vs laminate because the only laminate I could find was fairly ugly and cost way too much.


One thing I want to warn about is the edging.  From this angle you can see that outside corners have to be cut in two direction to make them match properly. I had to think more than a few steps ahead on this one.

The L-shaped edges were the product of a lot of careful cutting of a treated 2x4.   I ended up with six 8' lengths which I sanded, stained and covered in Minwax.  Each has three coats.  I intentionally did not color match them to the surfaces for the simple reason I want a little contract.    You will note that the vertical and horizontal surfaced do match even though they are completely different materials.


This is a retro picture of Lenard Nemoy.  It has nothing to do with the project, but you have to admit its a VERY cool photo.  I would like to reference the photographer, but none was posted.

If you are not chucking a little, my humor is lost on you.


My intent with the forward berth bulkhead was to introduce some support into the structure since I took out the vertical teak 2x4 holding up the cabin roof on the SB side.  I don't really think my work here is going to matter all that much, since the boat is much more rigid than one would think.  Still, I wanted to add a little character back.

Though I had intended to add a little "flow" to the portal, it kind of ended up looking like a duck's head once I matched it to the contour of the cabin roof.  Of course I did not fully appreciate this unfortunate resemblance until AFTER I had expoxied it in.

Quack Quack.

Once installed it looked much better.  You can also tell the difference from when I've primed the hull.  It's no longer the drab speckled brown.  I intend to paint it bright white once I get further along.

I could do some paneling, but that would a LOT of work and planning.  If my patience does not exhaust itself with this finish work, I'll consider it.


When I flipped the cooler up and inserted the wood to finish it, I found that I could not grab the handle anymore....once again, I neglected to plan 10 steps ahead.  Remember these things, kids.

I had to installed a secondary handle.  It works fine and does not look all that bad.


Getting the forward berth v-panel into place was a hassle.  Besides the fact that if you are off by the slightest fraction of an inch in any direction it will not fit, I had to make sure I cut a hole in the facing to match the hole in the supporting wood underneath.

I should have made both pieces at the same time to make this easier.  Hindsight.  The door is original.  I encourage everyone to reuse anything you can.  Fabrication does get tedious.  Yes, the color is off, but I'm not as concerned as I should be.

This is what it looked like before, BTW.

 My intent is to finish painting the entire area and then reinstall the teak stripping that lines the shelves.

If you look carefully, you can see that each shelf now has a triangular support reinforcing it.  To get the supporting panel into place, I had to cut the shelves at an angle and thereby removing an anchor point. The supports are so strong that I can now step on the shelves when crawling in and out of the hatch, something I could not do before.  I would encourage this addition.  These shelves are only taped into place.  They can carry very little weight.